KryoFlux
Table of contents
Introduction
KryoFlux is used in the lab to image 5.25” and 3.5” floppy disks. Kryoflux is a hardware and software system that can read, convert, store, and write contents of various legacy disk formats. The system consists of a control board and a Java application, DiskTool Console (DTC). DTC refers to the command line interface. The DTC folder contains a jar file user interface. Before KryoFlux can be used on a computer for the first time setup must be completed through DTC. Here you will find initial setup instructions and optional settings. Kryoflux software package names in these instructions may not exactly match depending on your OS. To image floppy disks with KryoFlux follow Digital Forensic Imaging instructions.
How Kryoflux works
Magnetic disks store data by changing the orientation of ferro oxide particles bound onto a durable and flexible plastic platter. The data is represented as flux transitions which indicate a change in the polarity of the magnetic field. Kryoflux records data from an attached drive as a flux data stream. Kryoflux can also output disk images in a variety of sector formats. Disk images are used in archival processing.
Requirements
- KryoFlux board
- USB port
- Floppy disk drive with standard 34 pin connector
- Drive cable
- Drive power supply
Assembly and installation
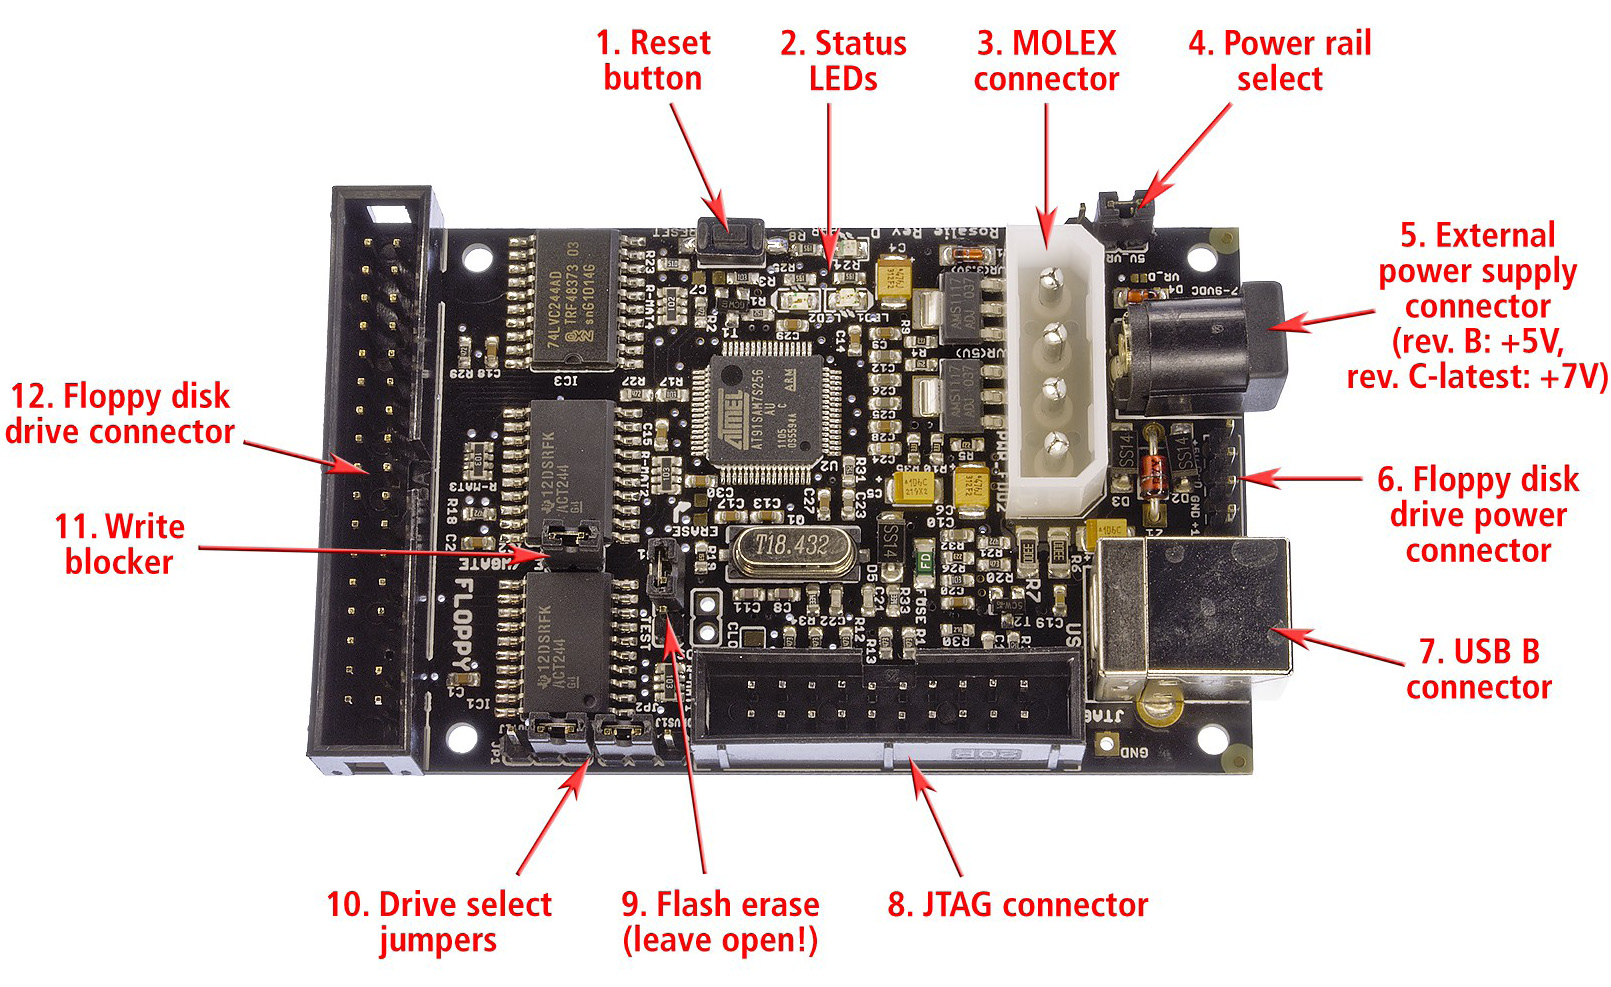
- Note the locations of
- the USB connector
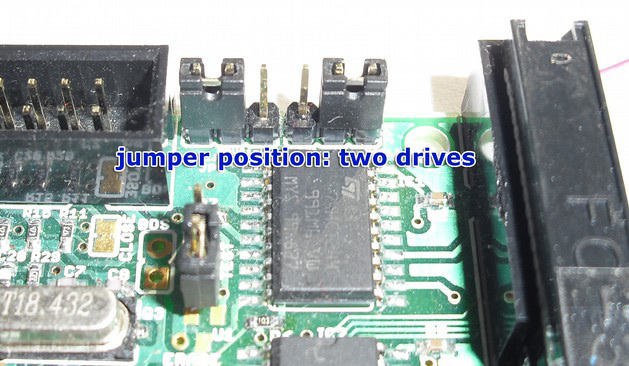
- the drive select jumpers
- the write-blocker
- the floppy disk drive connector
- Place the KryoFlux board and the disk drive on a flat, non-conductive surface.
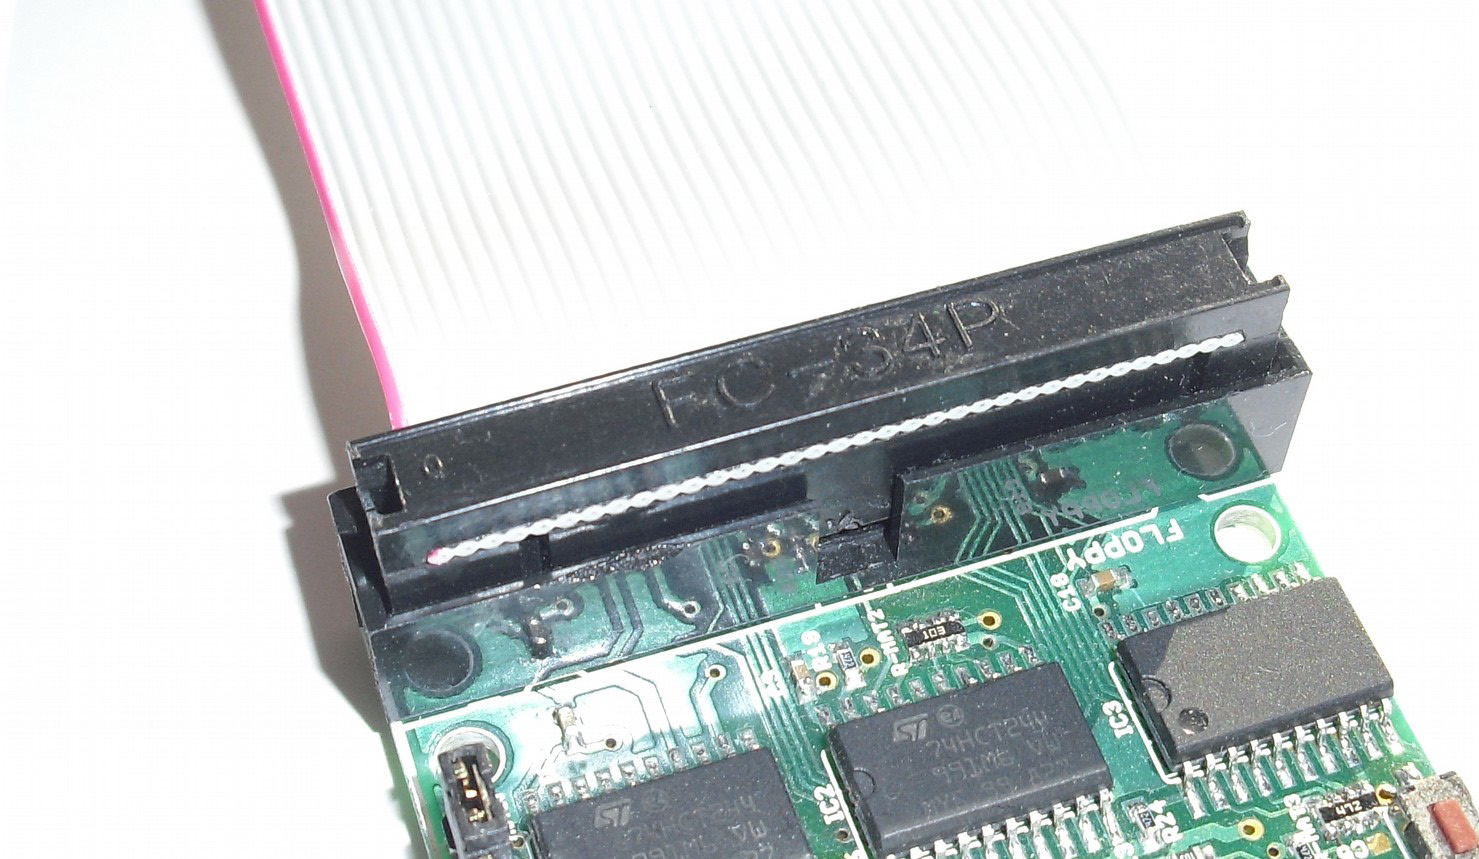
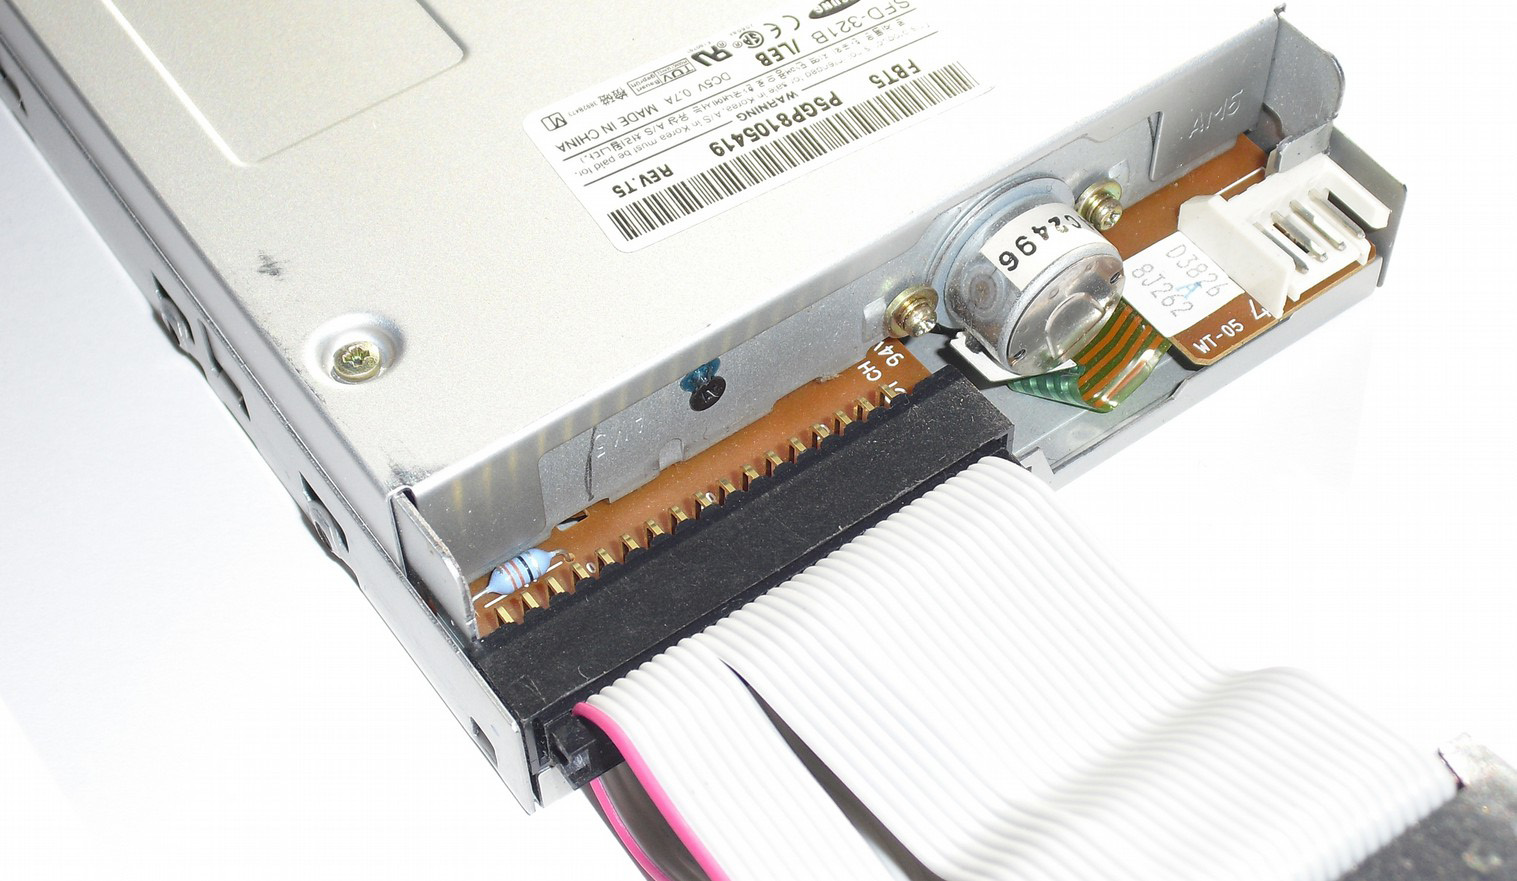
- Connect KryoFlux and drive with floppy data cable. Check for the correct orientation, the marked wire (usually red or white) signals data line 1.
- Make sure line 1 is pointing towards drive select jumpers on KryoFlux board.
- Usually, pin 1 faces left when looking at the drive from above with the drive pointing away from you.
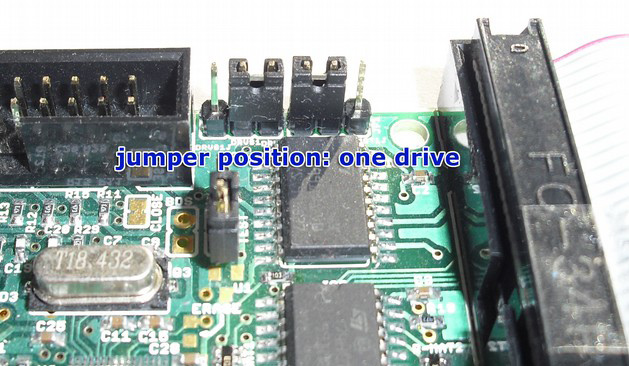
- Set the drive select jumpers to the inner position for initial installation. After one drive has been installed you can set the jumpers to the outer (2 drive) position.
- Connect the power supply to the drive. Do not connect the power supply to a power outlet yet.
- Download the KryoFlux software package and extract it.
Windows:
- Copy DTC to the location where you want to execute it.
- Disconnect from the internet to avoid auto-installation of incorrect drivers.
- Attach the USB cable to KryoFlux and then attach it to your computer. Do not use a USB hub.
- Windows will ask for a driver. Select Browse my computer for drive software. Select “KryoFlux USB driver.inf”. Wait for installation to finish.
- Open Command Prompt.
- Change to dtc directory.
cd KryoFlux\dtc - Enter
dtc -c2 - Plug power supply into power outlet.
- Repeat
dtc -c2 - DTC will check for maximum track access. The seek might fail but this should not interfere with operation.
- Check to see if Windows 10 installed a Bossa device under COM ports. In this case, right-click and choose to replace the driver manually. Repeat the instructions after opening Command Prompt.
- Check to see if Windows installed any unknown drivers under ports. In this case, right-click and choose to replace the driver manually. Repeat the instructions after opening Command Prompt.
- Re-connect Windows computers to the internet.
Mac:
- Run KryoFlux.dmg installer.
- Attach the USB cable to KryoFlux and then attach it to your computer. Do not use a USB hub.
- Open Terminal.
- Change to dtc directory.
cd KryoFlux\dtc - Enter
dtc -c2 - Plug power supply into power outlet.
- Repeat
dtc -c2 - DTC will check for maximum track access. The seek might fail but this should not interfere with operation.
BitCurator:
- Install libusb 1.0.9 if it is not already installed.
- Make sure VirtualBox has the correct USB added.
- Copy X86 dtc files to usr and lib:
| Copy | Paste |
|---|---|
| x86_64/static/dtc | /usr/local/bin/ |
| x86_64/lib* (files starting with lib) | /usr/local/lib/ |
| firmware_kf_usb_rosalie.bin | /lib/firmware/ |
- Copy kryoflux-ui.jar
- Install gcc-4.9 from Terminal.
sudo add-apt-repository ppa:ubuntu-toolchain-r/test
sudo apt-get update
sudo apt-get install gcc-4.9 g++-4.9
sudo update-alternatives --install /usr/bin/gcc gcc /usr/bin/gcc-4.9 60 --slave /usr/bin/g++ g++ /usr/bin/g++-4.9 - create/add rule to udev.
sudo nano /etc/udev/rules.d/80-kryoflux.rules - Add lines so the device nodes are owned by the floppy group.
ACTION=="add", SUBSYSTEM=="usb", ATTR{idVendor}=="03eb", ATTR{idProduct}=="6124", GROUP="floppy", MODE="0660" - Add user to floppy group.
adduser -G floppy [username] - Open Terminal.
- Change to dtc directory.
cd KryoFlux\dtc - Enter
dtc -c2 - Plug power supply into power outlet.
- Repeat
dtc -c2 - Restart if needed.
Using the GUI
- Double click kryoflux-ui.jar to open the GUI. Check Java installation if the GUI won’t launch.
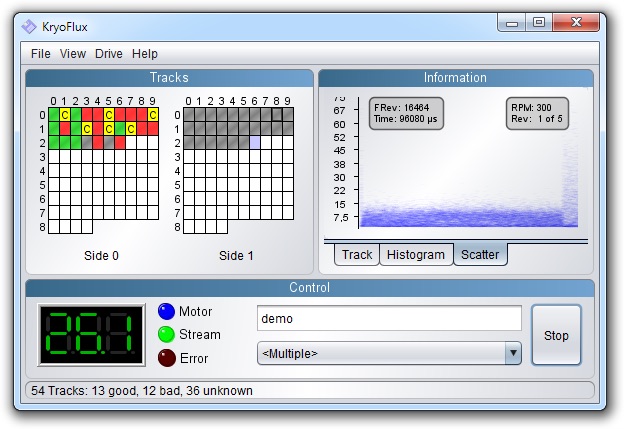
- The left section of the GUI window displays disk tracks as blocks on side 0 and side 1.
- Green blocks indicate a track is decoded.
- Orange blocks indicate a track is decoded and has been modified. The disk has been written to more than once.
- Grey blocks indicate an unknown sector format or an unformatted disk.
- Red blocks indicate a track is decoded with errors. Kryoflux will retry the track the number of times indicated in settings.
- Yellow blocks indicate a track is decoded with warnings. Change sector size until the result is green or orange.
- Point to a track to get information about the result. The result will output in the status line.
- The right section of the GUI window displays visualizations of stream files as they are written.
- The lower section of the GUI window displays track number and information, drive controls, filename, and sector format drop down.
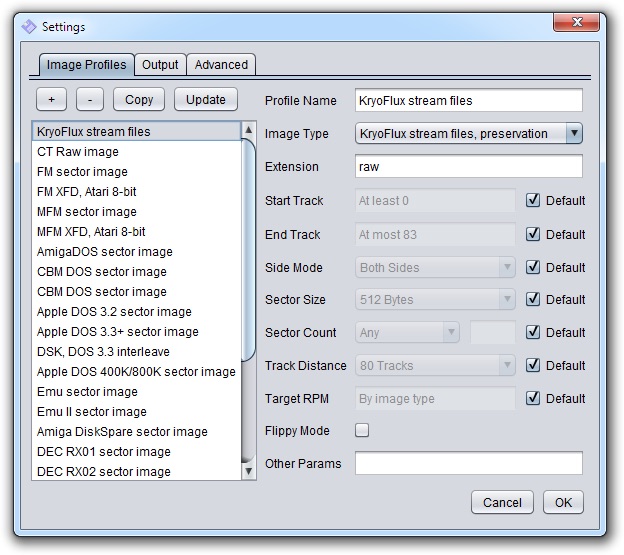
Settings
- The file menu displays Settings.
- The Image Profiles tab contains most settings for creating disk images.
- Click Copy to use an existing profile as a template.
- Click Default check boxes to edit fields.
- The Advanced tab contains a field to set the number of retries per track.
DiskTool Console
DTC is the command line interface for KryoFlux. Some options available in DTC are not available through the GUI.
- Enter the following parameters before image type:
- file name
- flippy disk mode
- image type
- start track
- end track
- output image start track
- output image end track
- output image track order
- single sided mode
- sector size
- sector count
- track distance
- rpm
- data band threshold
- extended cell band search
All parameters:
-f
-i
-m
-d
-dd
-l
-r
-t
-tc
-tm
-a
-b
-s
-e
-g
-z
-n
-k
-ks use only selected tracks during analysis (default auto)
-v
-x
-y set flippy disk mode
-oo
-os
-oe
-ot
-p create path
-c
-pg
-pf
-pw
-ph
-px
-py
-pd
-pr
-w write image to disk
-wi
-wp
-wm
-wy write: write side 1 to side 0, side 1 becomes unformatted
-y write: -wy for flippy disks imaged in a single pass
-g
-k
-ks
-wg
-wk
-wv
-ww
-wt
-wb
-we
Image types supported for reading from a disk:
0 KryoFlux stream files, preservation
0a KryoFlux stream files, format guided
2 CT Raw image, 84 tracks, DS, DD, 300, MFM
3 FM sector image, 40/80+ tracks, SS/DS, SD/DD, 300, FM
3a FM XFD, Atari 8-bit
4 MFM sector image, 40/80+ tracks, SS/DS, DD/HD, 300, MFM
4a MFM XFD, Atari 8-bit
5 AmigaDOS sector image, 80+ tracks, DS, DD/HD, 300, MFM
6 CBM DOS sector image, 35+ tracks, SS, DD, 300, GCR
6a CBM DOS sector image with error map
7 Apple DOS 3.2 sector image, 35+ tracks, SS, DD, 300, GCR
8 Apple DOS 3.3+ sector image, 35+ tracks, SS, DD, 300, GCR
8a DSK, DOS 3.3 interleave
9 Apple DOS 400K/800K sector image, 80+ tracks, SS/DS, DD, CLV, GCR
10 Emu sector image, 35+ tracks, SS, DD, 300, FM
11 Emu II sector image, 80+ tracks, DS, DD, 300, FM
12 Amiga DiskSpare sector image, 80+ tracks, DS, DD/HD, 300, MFM
13 DEC RX01 sector image, 77+ tracks, SS, SD, 360, FM
14 DEC RX02 sector image, 77+ tracks, SS, SD/DD, 360, FM/DMMFM
15 CBM MicroProse sector image, 35+ tracks, SS, DD, 300, GCR
16 CBM RapidLok sector image, 35+ tracks, SS, DD, 300, GCR
17 CBM Datasoft sector image, 35+ tracks, SS, DD, 300, GCR
18 CBM Vorpal sector image, 35+ tracks, SS, DD, 300, GCR
19 CBM V-MAX! sector image, 35+ tracks, SS, DD, 300, GCR
20 CBM Teque sector image, 35+ tracks, SS, DD, 300, GCR
21 CBM TDP sector image, 35+ tracks, SS, DD, 300, GCR
22 CBM GCR image, SS, DD, 300, GCR
22a CBM GCR image with mastering info, SS, DD, 300, GCR
23 CBM Big Five sector image, 35+ tracks, SS, DD, 300, GCR
24 CBM DOS extended sector image, 35+ tracks, SS, DD, 300, GCR
25 CBM OziSoft sector image, 35+ tracks, SS, DD, 300, GCR
Image types supported for writing to a disk:
0 auto-detect
1 IPF image
2 Amiga ADF sector image
3 CBM G64 image
4 KryoFlux stream files