Housing, Storage, and Handling
This section details how to select the proper housing and containers for various types of archival materials, as well as special handling information for specific format types. This section addresses boxes, folders, oversized content, as well as how to handle photographic material, artwork, and artifacts.
When choosing housing for archival materials, make sure the housing is as close in size to the actual object as possible. Large containers, particularly oversized folders, are challenging to serve and tricky for storage. It is usually possible to order a smaller container when one is not readily available, or to work with collections care to have a box made.
If you are unsure the best way to house any archival material, talk to your supervisor. Collection management is also available to consult around questions about housing and storage. If you know that your collection has oversized or irregular sized content, make sure to notify your supervisor and Collection Management as soon as possible. This helps Colection Management plan how and where to store this material.
Collection Management has compiled information about the storage limitiation 🔒 at each location. Also make sure to consult Collection Management’s Visual Guide 🔒 for information about how to label, barcode, and measure each type of container.
Table of Contents
Boxes
When a collection is received in the Archival Processing unit, Collection Management will rehouse materials into containers that fit onto shelves. The most common container type for new acquisitions is a record carton. Collections that arrive housed in archivally safe, acid-free boxes can be kept in their original containers. However, even though a record carton is considered safe and suitable for long-term storage, it is more challenging for reading room staff to retrieve, and for researchers to use. Collection materials stored in record cartons should almost always be rehoused into a legal-size document box or other standard size archival box. If a collection is stored in old, damaged, or unstable containers, then rehousing will always be necessary.
In order to keep the work room clearn and organized, and to reduce the impact on our facilities collegues, please always break down your boxes before recycling. Additionally, while some archival boxes can be reused, refrain from keeping boxes that have extraneous labels or writing that cannot be easily covered or removed. For example, if a flat box has multiple labels on each side, is marked up in ink, or is in poor condition, it should be recycled, as it cannot be reused for a new collection.
Legal-size document boxes are the standard box used for most collections. Letter-size folders can go into legal size boxes if re-foldering is not necessary. If an item can fit in a legal document box, it should not be placed in an oversized or flat container; this practice will keep the records snug and prevent damage during movement.
Take care to only include one size of folder in a single box, with the exception of legal-sized document boxes, which can accommodate both legal and letter size folders. Oversized items will require an appropriately-sized flat box, folder, or tube. See the section of this documentation on oversized material for more information.
Improperly housing collections can damage documents and also take up unnecessary storage space. If a box is packed too loosely, folders may shift when the box is moved, and the folders may bend or open causing the materials inside them to curl and slump. If a box is too full, documents may bend, tear, or crease.
If you are unsure about the best way to house a particular item in your collection, ask your supervisor. Collection Management can also help advise on the best way to house materials for long term storage
Intellectual Arrangement and Physical Arrangement
Boxes may contain more than one series. The physical order in the box may differ from the order in the finding aid.
Legal Document Boxes are the Preferred Standard
Even if a collection is received in letter-size folders, they should usually be placed into a legal-size document box. A legal-sized document box can house both legal and letter folders. If the original folder is damaged or annotated, it is good practice to place the original folder inside a new legal-sized folder.
Volumes
Volumes that can comfortably fit, should be placed in folders, and filed spine-down in document boxes. If the volumes are fragile, large, or in poor condition, consult with your supervisor. You may need to coordinate with collections care to make a custom box.
Do Not Overfill Boxes
If the box is bulging and the flip-top lid cannot be easily lowered, remove folders until the box closes and the content is secure.
Take care that boxes are not too heavy. Remember that Collection Management will have to ship these items to their permanent storage locations, and reading room staff will have to move these boxes off carts and shelves. If the box is too heavy, it is also likely too full.
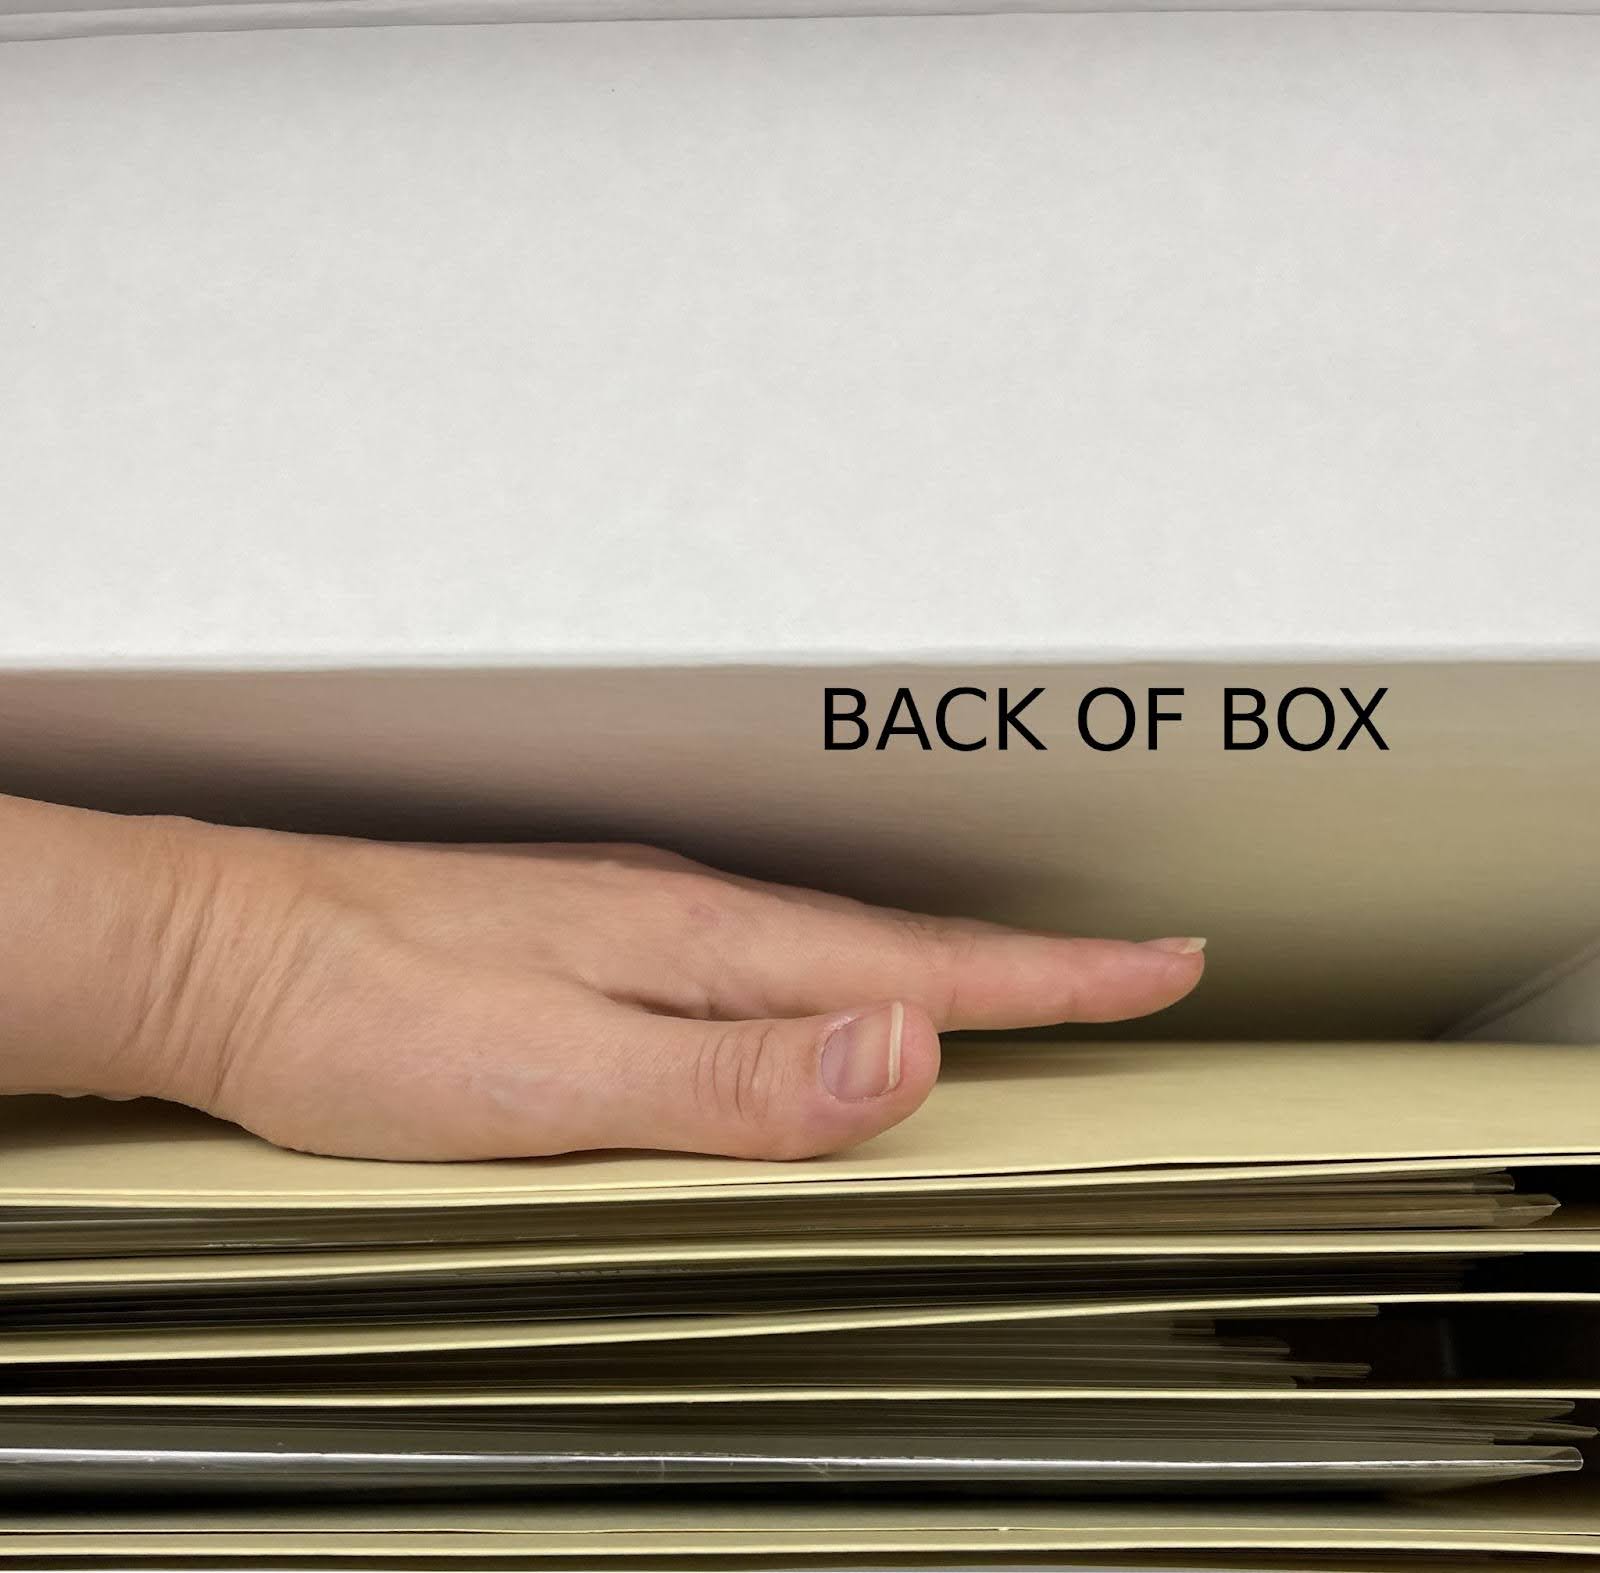
If you cannot easily remove a folder from the box, then the box is too full. Researchers should be able to remove and return a folder to the box without it getting stuck, damaged, or affecting the other folders. If you can comfortably place your hand behind the last folder in the box, without too little or too much space, then the box contains just the right amount of material. See the example image below:
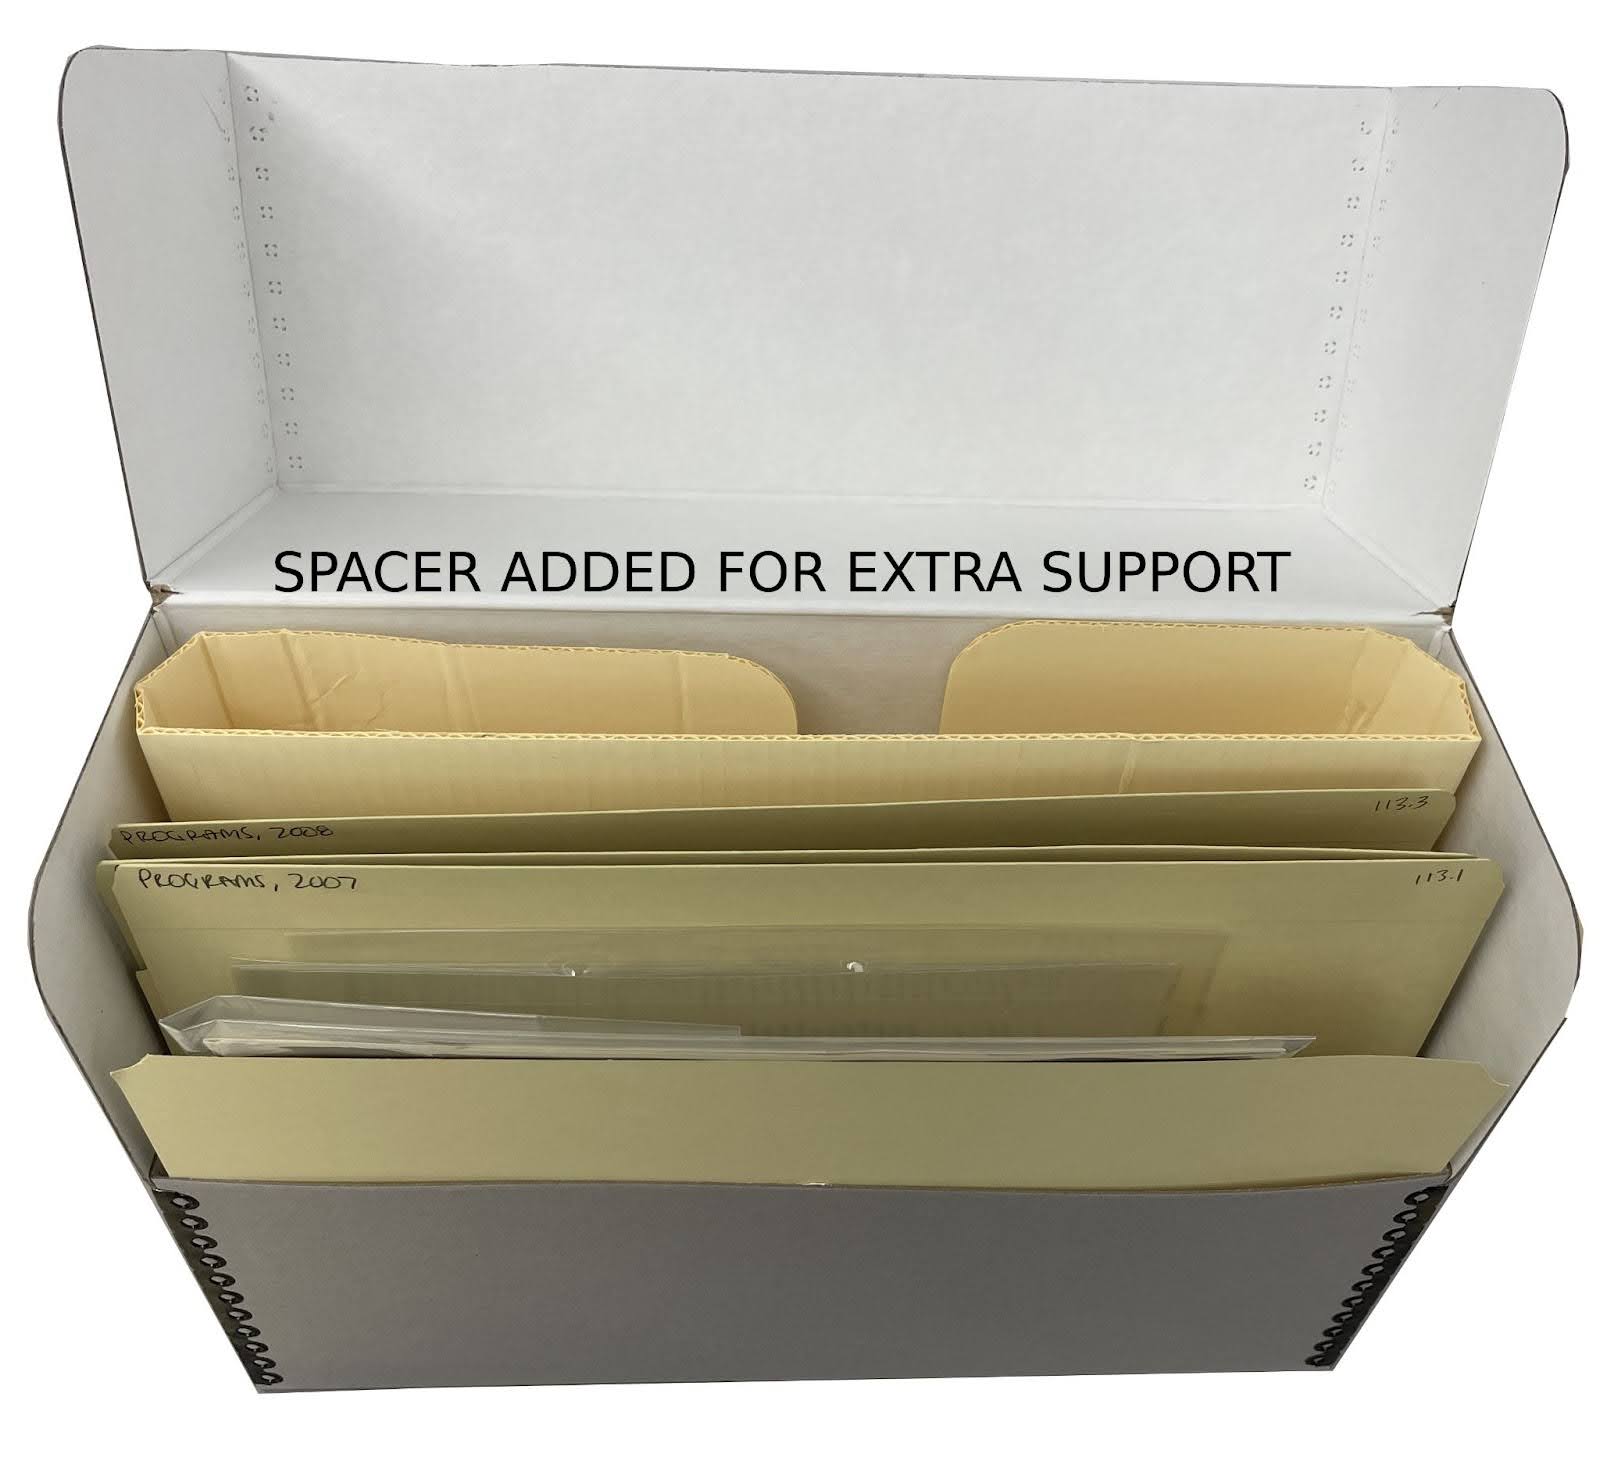
If there are not enough folders to fill the final box, place a rigid acid-free spacer, appropriately configured, behind the last folder. See the example image below.
Flat Boxes Should Only Contain One Folder Size
Each flat box should contain only one size folder and the folder should be specific to the box size. For example, a 19” x 25” box should only contain 19” x 25” folders. Smaller or larger sized folders than the dimensions of a single box may cause damage to the materials during handling and transit.
Numbering Boxes
As you fill archival boxes, number boxes consecutively throughout the collection; do not restart box numbers with each series or subseries. This will keep the collection accessible and in order while you process the collection. There are different ways to do this, as each archivists’ method varies. One suggestion is to label each box with a post-it note, identifying the name of the collection and box number. Another suggestion is to write lightly in pencil at the location where each box will be labeled later, therefore you don’t have to take time to erase.
Additionally, do not use prefixes or suffixes when adding new boxes. Use the next consecutive box number available in the collection.
Folders
Below are some guidelines for using folders in archival collections.
Use Original Folders When Possible
In most cases, the original folders in a collection will be re-used. If the original folders are damaged or not archivally sound, they should be replaced. Even if the original folder can not be reused, for example if it is too full, you should still retain the folder and place it inside the new folder. This is especially important if the original folder includes annotations, or if the folder tile is not being retained in the finding aid.
Foldering Loose Items
Loose items will also need to be placed in folders. Legal and letter-size folders have creases (score lines) along the bottom. Use these score lines to expand the folder to optimally fit the material to lay as flat as possible.
Legal Folders Are the Standard Folder Size
Legal-size folders are the standard folder size for housing. Existing letter-size folders can go into legal-size boxes if re-foldering is not necessary.
Place the Old Folder into the New One
If you are not using the original folder because it is the wrong size, you can still include it inside a new folder. This is good practice if the original folder has useful information included. Similarly, if an original folder has labels adhered to the outside, you may use staples to secure them from falling off.
Items Should Fit Inside Folders
Material should not stick out of the sides or the top of the folder. Use a larger folder if materials do not fit.
Create Additional Folders When A Folder is Too Full
If a folder was overfilled originally, create two or more folders. Repeat the folder title, and make sure that the order is maintained when items are split between folders and placed in a box.
Working with Loose Papers
Place loose papers into folders, keeping adjacent and related items together.
Folded Items in Folders
Folding large items and retaining them in letter or legal-size containers is often permissible if the item is in good condition and is of low artifactual value. The decision to fold or unfold should be made in consultation with your supervisor.
Folders in Flat Boxes
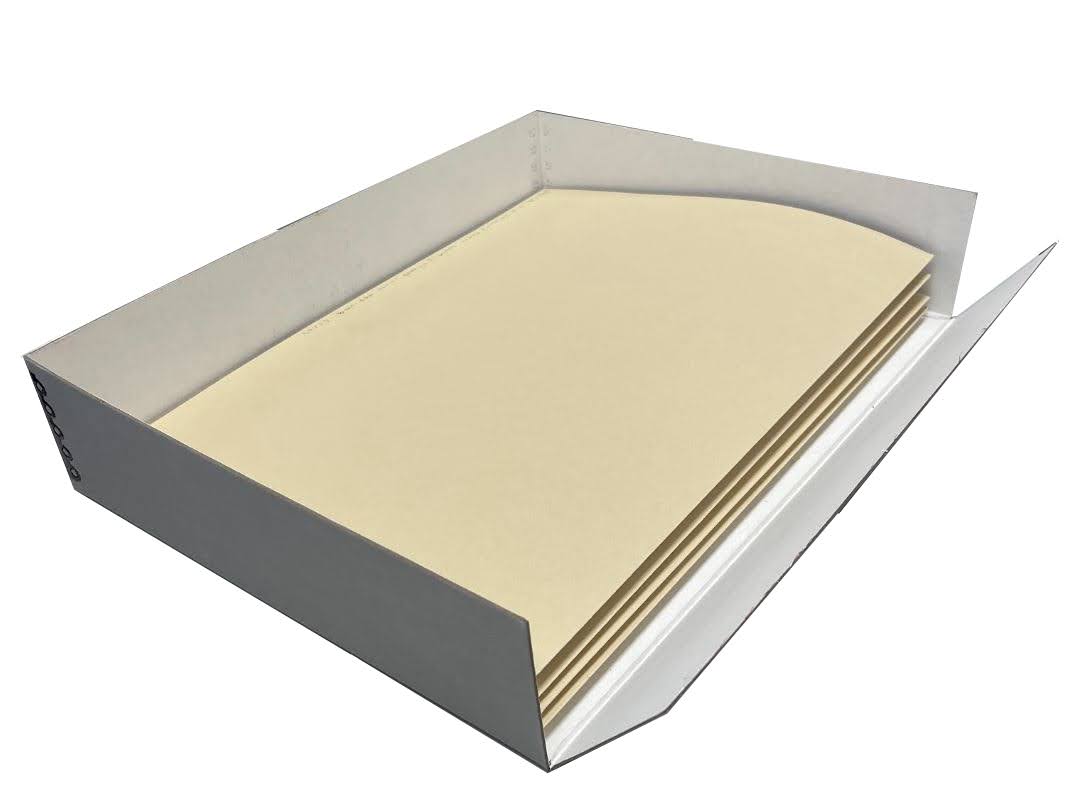
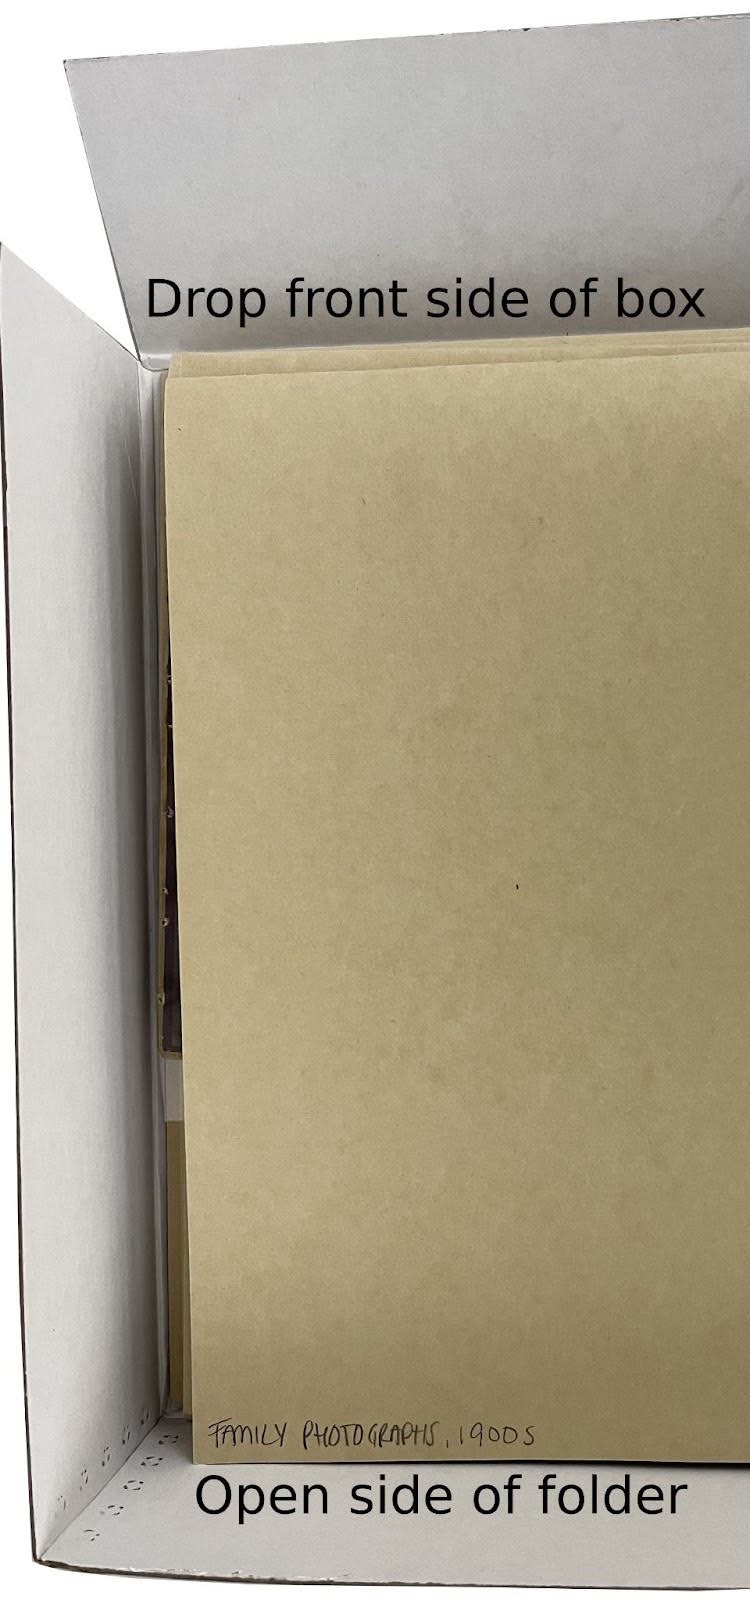
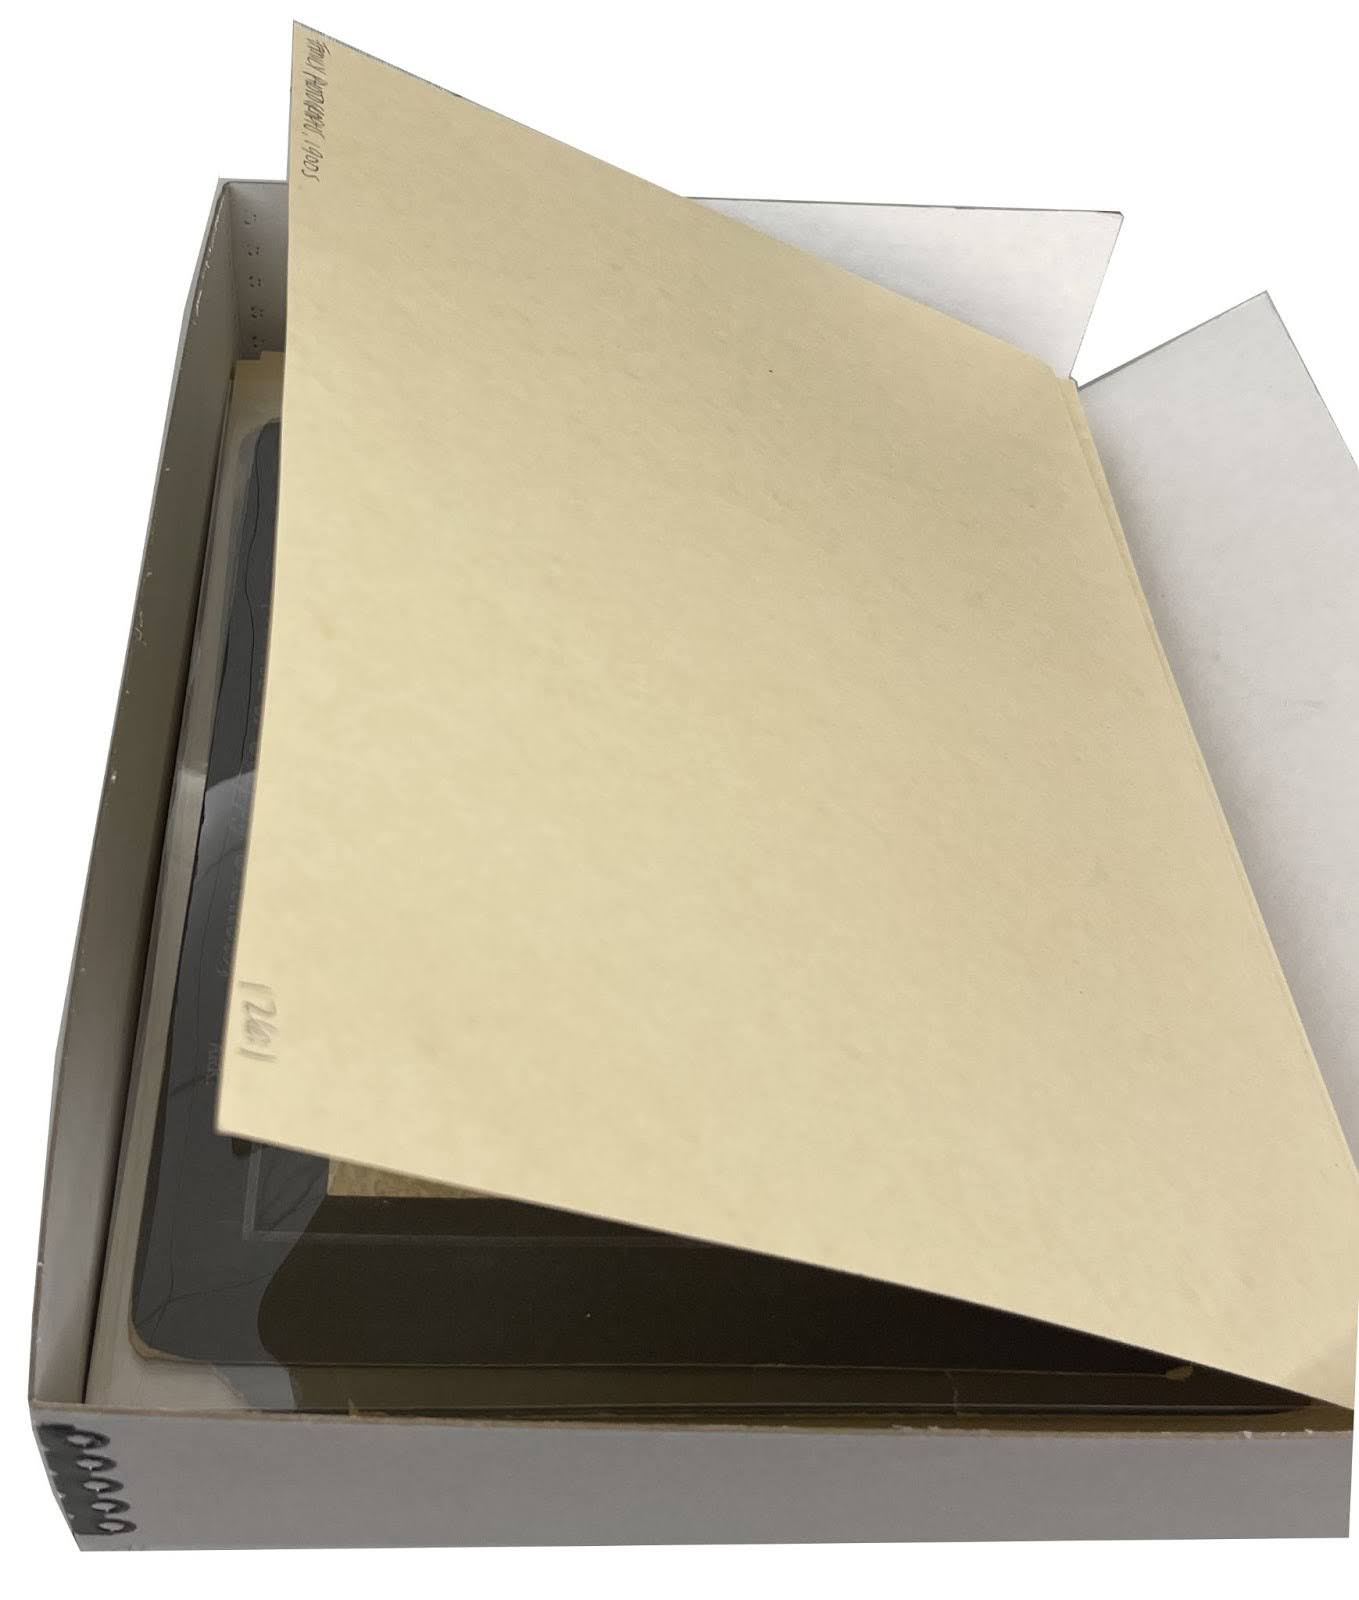
Folders should be placed inside flat boxes with the closed edge facing out towards the open drop front edge. The open side of the folder which (contains the folder title, date, box, and folder number) should be placed against the closed side of the box. See the images below that illustrate this.
Oversized Materials
Oversized is a physical classification of material for storage purposes, not an intellectual designation in archival arrangement. Oversized refers to materials that do not fit in a standard-size document box. The Archival Processing unit has a large selection of oversized flat boxes and folders onsite in various sizes.
Always make sure the housing is as close in size to the actual object as possible. Also make sure to notify your supervisor about any oversized content in your collection as soon as you find it. Ideally this should be addressed in the processed proposal, and Collection Management should be notified so they can plan for the item’s storage.
Larger-format papers and photographs should be placed in folders by size, and those folders should be housed in a flat box. While oversized items will be physically arranged separately from the rest of the collection, they should be intellectually arranged and described within the context of the rest of the collection. An oversized box of photographs, for example, will be described as photographs, not as oversized material, and will be arranged in intellectual order, even if the box or folder numbers are out of sequence from the rest of the photographs.
Papers and photographs that are larger than the largest flat box (28 ½” x 22 ½” x 3”) should be placed in oversized folders. Folder information (title, date(s), box and folder number) should be recorded on the open end of the folder, rather than near the crease. Oversized folders should also include a barcode. See Collection Management’s Visual Guide 🔒 for correct label and barcode placement.
Numbering Oversized Boxes
Always attempt to leave the numbering of oversized boxes until the end, so that these boxes are assigned the highest box numbers in the collection.
Flat Boxes
When using flat boxes for oversized material, use boxes as close in size to the items as possible. Items can be damaged when housing is too large or too small.
Oversized folders
If an item is too large for a flat box, it should be placed in an oversized folder.
Oversized folders are never sent to ReCAP. These are shipped via the Registrar to their respective curatorial divisions, where they are stored in map cases. Folders that are ready to be shipped should be placed in the map cases in the stacks. Make sure to update the folder’s location in SPEC so Collection Management can find the items.
Folded items should remain folded and be placed into an appropriately sized folder. Unfolding items can potentially create unnecessary damage that is irreversible. Consult with your supervisor if you think something needs to be unfolded and preserved flat.
Tubes
Large rolled posters should remain rolled and be placed in tube boxes.
Archival Bags
Items and artifacts that are too large for folders or boxes may be placed in archival bags, and labeled and barcoded just like a box. Consult with your supervisor and Collection Management before housing archival materials in bags to assure this is the best storage solution.
Photographic Materials
Many of the collections we process include photographic materials. Photographs have historically been the most requested items in NYPL reading rooms, and should be arranged and handled in a manner that can accommodate this high research demand. This section explains how to handle photographic materials you may encounter during processing. Most recommendations are from the University of California’s Guidelines for Efficient Processing. We also suggest consulting the Library of Congress’ Photographs and Prints Division website, Image Permanence Institute, and the SAA book Photographs: Archival Care and Management. A copy of this book is available in the conference room reference library.
Photographic materials that are located within the folders of other types of materials should generally not be physically separated. The photographs should be described within their existing context, and their locations can be noted in the finding aid’s container list and/or scope and content note. A form and genre term subject heading should also be added, which will notify researchers searching the catalog, as well as users scanning the finding aid’s front matter, that the collection includes photographic material. For more information on writing archival description, refer to the Archival Description section of this documentation. For more information about choosing accurate subject terms, see the Controlled Access Terms section of this documentation.
Photographic Prints
The Smithsonian’s Archives of American Art (AAA) provides extensive guidelines on the preservation of photographic materials. Below are guidelines adapted from the AAA manual for the most common photographic materials that the NYPL houses.
To adhere to efficient processing, it is recommended to interleave personal photographs dating before 1950. Additionally, photographs that are deteriorated (such as early color photographs), damaged, fragile, or particularly significant should also be interleaved. Photographs that are included in folders of mixed material should always be interleaved to protect them from highly acidic documents such as newspapers.
Small photographs (smaller than 4”x5”) should be interleaved or placed in a larger paper envelope, to prevent getting lost among larger papers or photographs.
Existing Enclosures
Photographs should always be removed from glassine, brown paper envelopes, or envelopes from photo-processing companies. It is recommended that photographs be removed from non-archival plastic binder storage pages, especially if the plastic has become brittle, discolored, sticky, or deteriorated.
Photographs may be stored in paper envelopes, polyester/Mylar sleeves, or acid-free archival polypropylene sheets. Every single photograph in a collection does not need to be housed inside a Mylar sleeve or an envelope (unless they were already housed in that manner). However, some collections will require special housing considerations and your supervisor will communicate this to you if necessary.
Cased Photographs
Before developing a stable paper-based printing technique, many photographic processes utilized metal or glass as a base for images. These were then often placed behind glass, in a hinged, decorative case. However, both the enclosures and photographs themselves look extremely similar. Identification of these photographs takes some effort, and will be described below. However, the handling and storage of these objects are the same. Cased photographs should always be stored with the front cover closed. Wrap the enclosure with buffed tissue. Cased photographs come in a variety of sizes, and range from a whole plate (6½” × 8½”) to a “gem” (1 ½” x 1 ½”). If your collection has several cased photographs, try to find a box where they fit securely. If there is any extra space, add buffed tissue so the photographs do not move inside the box. Occasionally, you will find a photograph that is not in a case, rehouse these items like you would glass plate negatives or magic lantern slides, which is explained below.
Daguerreotypes: 1839 – 1860s, Glass plate with silver emulsion. Can be identified by a mirror-like surface. When placed on a dark background, the image appears to be a positive image, as the clear glass lets the color show through, the silver remaining on the plate reflects light to appear to be the lighter tones of the picture.
Ambrotypes: 1854 – 1880s, Glass plate was coated with collodion and dipped in silver nitrate. Ambrotypes have a less mirror-like surface than the daguerreotype. Like the daguerreotype, this plate is housed with a dark background, but when viewed from different angles, the image appears in both the positive and negative.
The ambrotype to the right illustrates a slightly damaged image, where the emulsion behind glass has been scratched, revealing the clear parts of the glass plate base.
Tintypes: 1853 – 1930s, Positive photograph on a thin sheet of metal, but often encased behind glass. When looking at a tintype at different angles, the image only appears in the positive.
The tintype to the right without a glass frame, when looked at from an angle the emulsion on top of the metal sheet can be seen.
Photograph Albums
Preservation decisions for photograph albums vary greatly depending on the condition of the album, and whether it is a bound volume or 3-ring binder of sleeves. The archivist, along with their supervisor, and in possible consultation with Conservation, will have to determine the level of preservation necessary for bound photograph volumes. When minimally processing a collection, do not take the time to interleave or dismantle bound albums unless they are especially significant, vintage, or damaged. Binders of photographs should always be dismantled and the sleeves placed in folders.
Slides
Slides should be stored in archival plastic slide pages. For efficient processing, only transfer slides to archival slide pages if the existing plastic pages have become brittle, discolored, sticky, or obviously deteriorating. Loose slides or slides stored in slide boxes should always be rehoused in plastic slide sleeves. Each slide should be placed in sleeves “emulsion side down.” This can be identified as the less shiny side of the negative in the slide case.
Negatives
Film-based negatives found within archival collections are cellulose nitrate, cellulose acetate, or polyester. To identify these three types, please refer to the Image Permanence Institute online guide.
Negatives should always be removed from glassine, brown paper envelopes, or envelopes from photo-processing companies.
Nitrate and Acetate Negatives
Nitrate and acetate negatives are unstable formats and will continue to deteriorate unless they are in cold/frozen storage conditions. When conducting a survey of a collection, if you find nitrate negatives or acetate negatives displaying vinegar syndrome, notify your supervisor immediately. Extensive exposure to degrading film can be hazardous to your health. Wear gloves and work in a well-ventilated area if you need to handle this material. If the decision is made to keep nitrate negatives or acetate negatives showing signs of vinegar syndrome, they should always be stored in separate containers from other collection material.
Nitrate Negatives
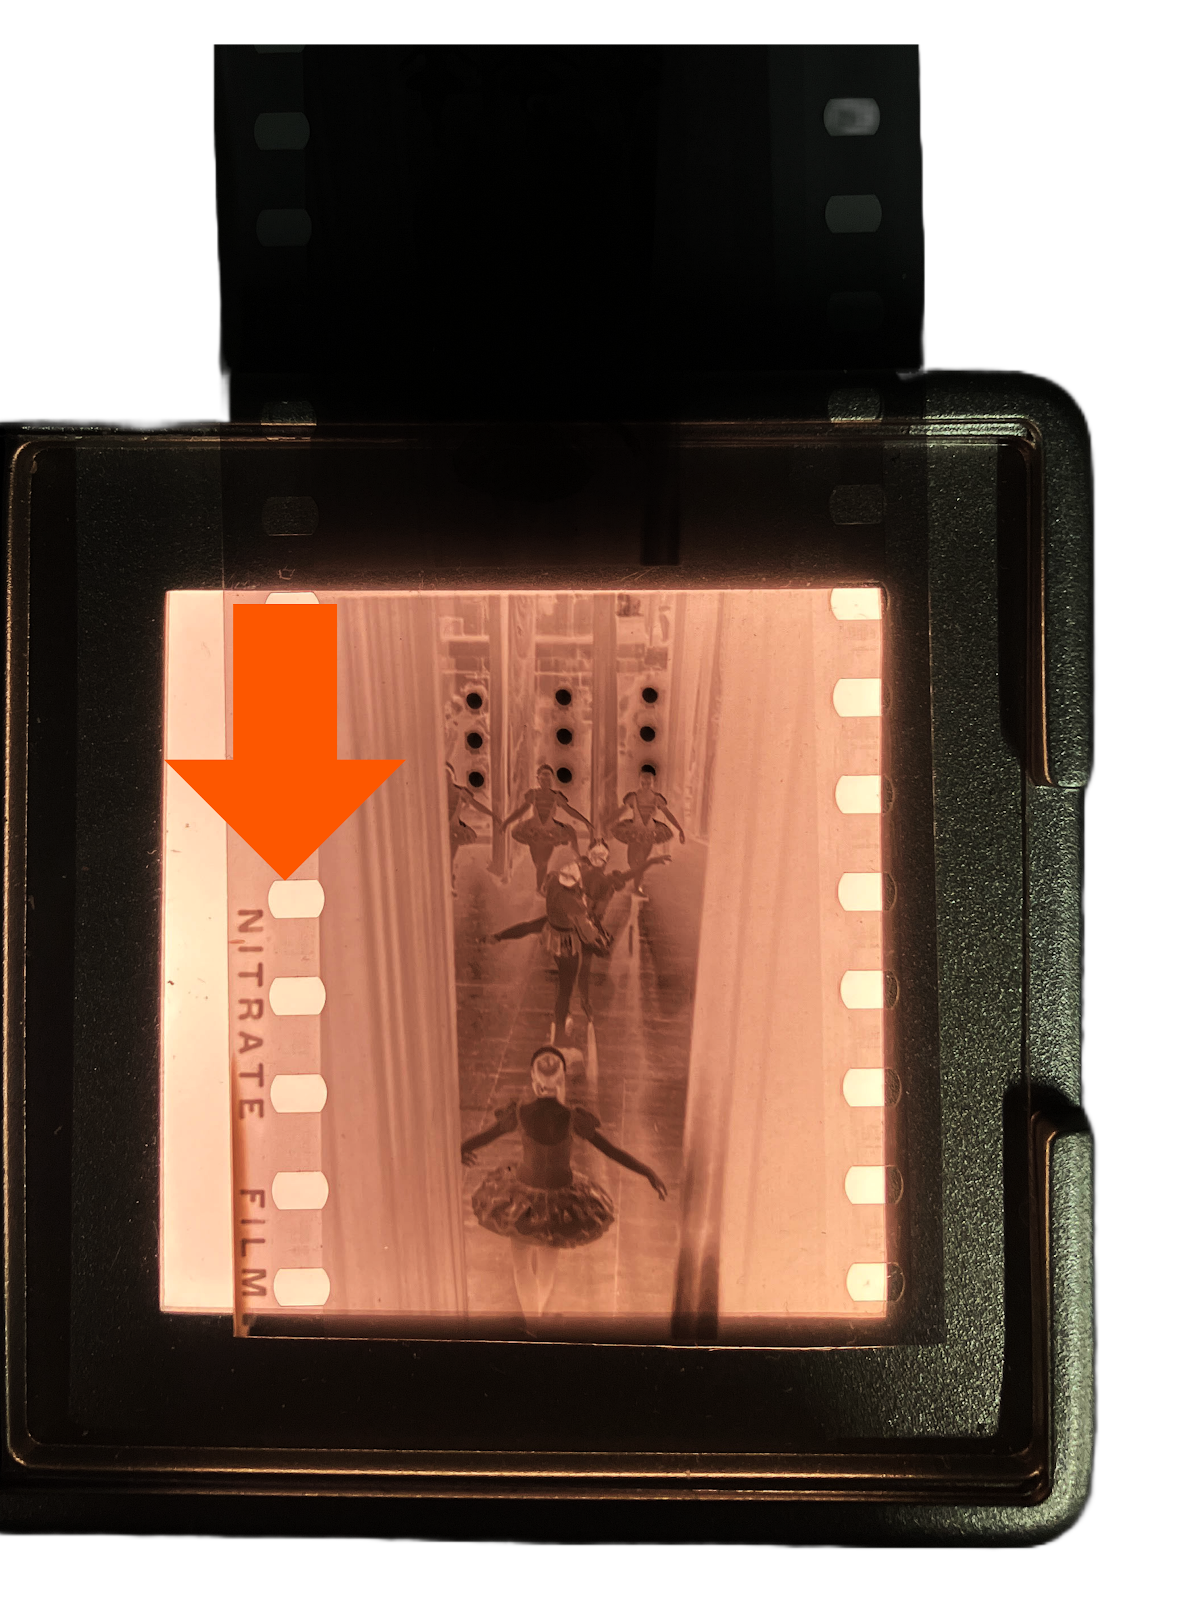
Nitrate negatives were produced from 1889 until the late 1950s. They are very similar in appearance to standard flexible non-nitrate black-and-white negatives. There are several ways to identify what type of negative you are handling. Most professional manufacturers print on the edge of the film “nitrate” or “safety” (non-nitrate) film.
Acetate Negatives
Acetate negatives that are not showing signs of vinegar syndrome may be stored in a box containing other material; however they should be placed in a separate folder because they will continue to deteriorate.Acetate negatives are a bit harder to identify visually, as they were still identified as “safety” by manufacturers. However, deteriorating negatives emit a powerful odor, and this deterioration is often called “vinegar syndrome,” as the base will have an extremely strong vinegar-like smell. If handling film, and you are unsure of the base and level of deterioration, there is also a test, where negatives can be placed in an air-tight container with an acid-detecting strip. This strip will then change color depending on the level of acid present.
Polyester Negatives
Polyester negatives are a very stable format and can be stored with other photographic or mixed material. It is still recommended that negatives be placed in a negative envelope or sleeve to separate it from other items in a folder. They can be interleaved as a group and not each individually. When storing negatives in plastic sleeves, they should be inserted emulsion-side down, the emulsion side is often identified as being less shiny and on rolled negatives, on the inner side of the curl.
Glass Plate Negatives
Glass plate negatives should be stored in a negative storage box appropriate for their size. Each glass plate should be placed in a paper envelope with the emulsion side facing away from the envelope adhesive. On glass plates and lantern slides, the emulsion is placed directly on the glass, and will appear to be right on the surface of the base. The non-emulsion side of the image appears to be behind glass. Odd sized glass plates should be placed in an envelope for the next size up, or in a handmade four-flap enclosure. If removing glass plates from old enclosures (small boxes, folders, or envelopes), transcribe any descriptive information onto the new negative envelope.
Lantern Slides
Lantern slides are typically a smaller format than glass plate negatives. They are usually color images (transparencies) placed within two pieces of glass and masked with tape on the edges. If a collection has large quantities, appropriate sized boxes (similar to Hollinger brand slide boxes) and four-flap enclosures can be utilized.
Artwork
In most cases, archivists should consult with their supervisor to determine if artwork requires any special housing or conservation needs. Artwork can be very large, and should always be stored flat, and never in tubes. When handling oversized works, be sure you have enough room to safely handle and rehouse items. Because artwork often requires additional housing, such as mats or mylar sleeves, be mindful of folder and box weight.
Artwork should always be stored in the appropriate sized folder. Charcoal, oil crayon, soft pencil, and pastel drawings should be interleaved with smooth interleaving paper with the smooth side facing the artwork. Avoid placing artwork with friable medium (charcoal, pastel, pencil), paintings, or inkjet prints into polyester/mylar sleeves as it will erode the surface over time. These items should be interleaved using the non-buffered thin interleaving paper or Permalife paper and individually foldered. Prints in ink, pencil sketches, or otherwise stable works on paper do not need to be interleaved, and can be foldered together at a manageable weight.
When handling artwork avoid creating friction on the surface of works. Friction can cause damage or scratches to artwork. Wearing nitrate gloves can help with handling more delicate works and photographic negatives, but ensure that hands are clean and dry. Art encased in mylar or with interleaving papers should be handled carefully. You should not allow anything to slide across the surface of the item, instead pull the interleaving papers off surfaces directly. When handling artwork inside a folder, be mindful to not let items slip. Transporting very large pieces may require two sets of hands to ensure works remain flat.
Artifacts
Small artifacts that are not fragile can be wrapped in acid-free tissue and placed in a pocket archival folder. Alternatively, small artifacts can be placed in a small box. Tissue can be used to wrap the items or to provide support around the item inside of the container.
Items that are accessioned as rolled documents should be rehoused into oversize map-folders if they can be flattened without damage.
Archival “shoebox” containers can be used to store notecards, inventory cards, and snapshot photographs. It is recommended to barcode each of these boxes individually and not to store them within record storage boxes.