Controlled Access Terms
After creating the front-matter description for the collection, add controlled access terms. Controlled access terms include agents (personal names, corporate names, family names) and subjects (topics, form/genre, occupations). This section will detail how to create those terms. See the Archival Process Manual section on controlled access terms for additional information.
Table of Contents
Agent Links
The Agent Links form allows for name terms to be associated with collections. Name sub-forms can be added by clicking the Add Agent Link button, or the + bar at the bottom of the form (button 1). Each sub-form should contain exactly one name link.
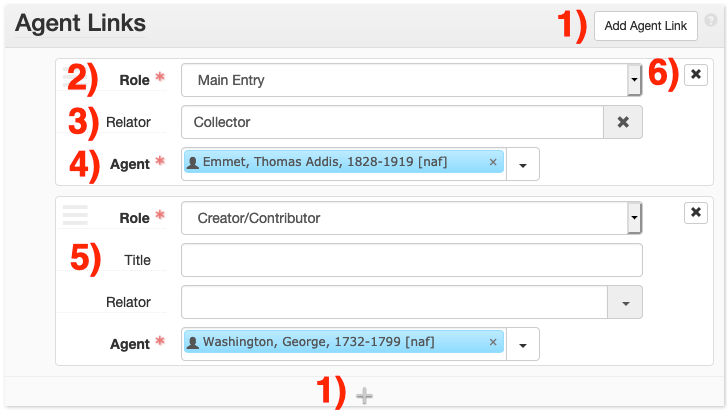
When adding an agent link, select the agent role from the Role menu (field 2). Use the following rules when selecting Roles:
Main Entry
Select Main Entry (MARC 1xx) if the agent is primarily responsible for the creation, assembly, accumulation, and/or maintenance and use of the materials being described. Generally, each collection should have exactly one Main Entry, although exceptions may arise for artificial collections when a main entry should not be used. See the Archival Processing Manual for more information on working with artificial collections.
Creator/Contributor
Select Creator/Contributor (MARC 7xx) if the agent created material in the collection, or contributed to its creation. You must also provide a Relator term (field 3) that describes the creator/contributor relationship with the collection’s main entry. Choose the term from the Library of Congress MARC Code List for Relators list. The most commonly used relator term is contributor.
Subject
Select Subject (MARC 6xx) if the agent is the subject of the collection, but is not represented materially in it. For example, correspondence about a person that is not by or to them would have that person as a Subject.
Subject Terms/Subdivisions
When supplying an Agent Link with the role of Subject, you will have the option to provide subdivisions under the Terms/Subdivisions form. Use this form to provide subdivisions to names used as subjects (e.g. Columbia University – Students).If an agent is represented by multiple roles in a collection (e.g. the main entry is also the subject of the collection), provide one agent link per role. Do not provide a secondary Creator/Contributor agent link for the Main Entry.
Searching For Agents
Provide the agent link in the Agents field (field 4). If the agent already exists in ArchivesSpace, it can be searched within the Agents field. Otherwise, the agent can either be found via Browse, or created via Create, under the drop-down menu to the right of the Agents field.

Agents can be detached from a collection via the x button (button 6). Note that detaching an agent from a collection will not delete that agent from ArchivesSpace, it will only remove it from that collection.
Creating New Agents
Before creating new subjects/agents in ArchivesSpace, please read the Archival Processing Manual section on creating agents records.
When creating name entries (families, persons, corporate bodies), use the Agent screen.
Provide each part of the name in its appropriate field (e.g. surnames in Primary Part of Name, suffices in Suffix.) Do not enter data in the Dates of Existence, Contact Details, Notes, Related Agents, External Documents, or Rights Statements sub-menus unless otherwise specified. Instead, provide vital dates under Dates.
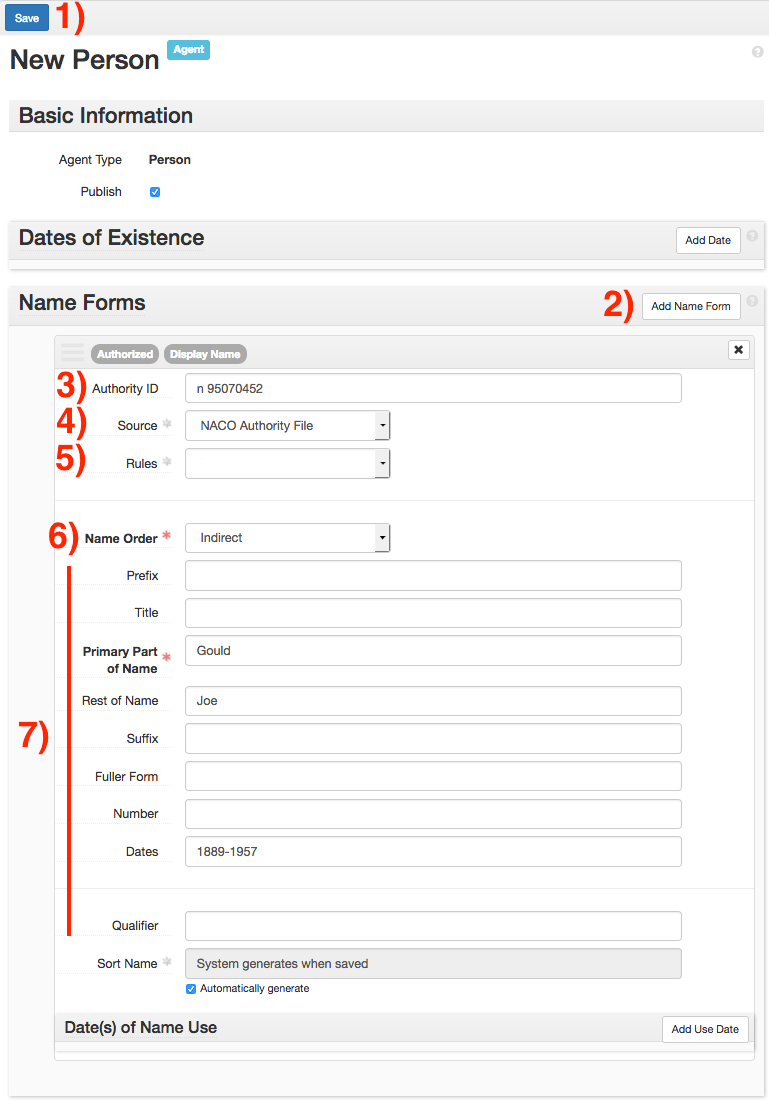
Additional name forms can be provided by clicking Add Name Form (button 2). This allows for the input of pseudonyms.
Provide the identifier of the name in Authority ID (field 3), when available. Information on which identifier to use is available in the Processing Manual.
Provide the source of the authorized name in Source (field 4). A list of acceptable sources is available in the Processing Manual. If the name is not from an external authority, use Local Unauthorized.
If the rules used to create the name are known, provide this value in Rules (field 5). All locally-created names should follow the rules set out in RDA Toolkit, Chapter 9. Do not provide a value for names found in an authority.
Provide the name order in Name Order (field 6). If a name is formatted as First Last, use Direct. If a name is formatted as Last, First, use Indirect.
Provide the name’s parts in the fields provided (fields 7). Follow the formatting in the term’s authority record when filling out these fields.
When finished, click Save Person (button 1) to save the record. If you created the agent from the Resource or Archival Object screen, this will automatically link the record to the agent. If you wish to create many agents at once, clicking +1 will save the current record and immediately open a new Agent screen.
Subject Links
The Subject form allows for subject terms to be associated with collections/components. The following term types of terms can be found in the Subject form:
-
Subjects
-
Genres/Forms
-
Occupations
-
Geographic terms

Do not provide Name subjects via the Subject form. Names should always be created using the Agent Links form.
Subject sub-forms can be added by clicking the Add Subject button (button 1) or the + at the bottom of the form (button 5). Each sub-form should contain exactly one complete subject heading.
Existing subject terms can be searched via the Subject field (field 2). Selecting the subject will associate it with the collection/component. If a subject does not appear in a search, click on the drop-down arrow (button 3), and select either Browse or Create.
Browse will open a list of all subject terms in ArchivesSpace. Selecting a term from this list will associate it with the collection/component.
Create will open up a form to create a new subject, and associate it with the collection/component.
Subjects can be detached from a collection/component via the x button on the right (button 4). Note that even if a subject is detached, the subject record will still exist in ArchivesSpace.
Creating New Subjects
Please refer to the Archival Processing Manual for information on rules and policies regarding creating access terms. When creating non-name subject terms, always use the Subject sub-menu.
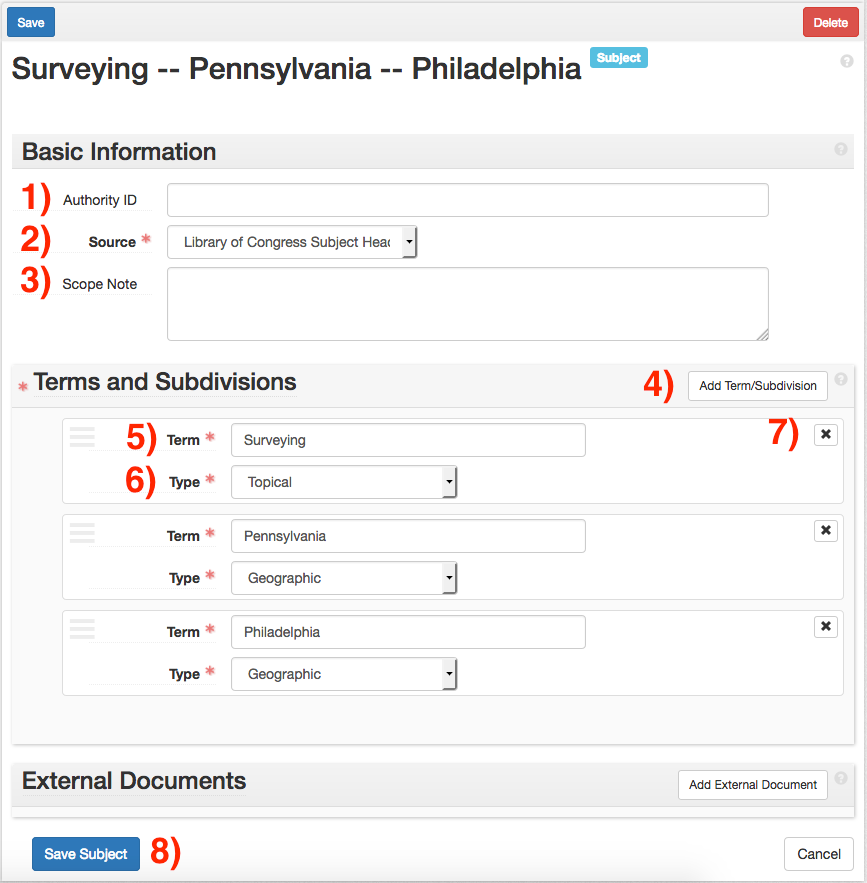
Provide the authority ID for the subject term in Authority ID (field 1). Use the following rules when providing authority IDs:
| Source | Rule |
|---|---|
| LCSH | Provide the LC Control Number. Only provide an identifier for headings without subdivisions. Do not provide an identifier for subdivided terms. |
| LCGFT | Provide the LC Control Number from the authority record. |
| AAT | Provide the URL of the term’s Semantic View page (e.g. http://vocab.getty.edu/aat/300263144.) Capitalize the first letter of the first word, but leave the rest lowercase. |
| ITOAMC | Do not provide an ID. |
Before editing existing IDs, or supplying IDs not in adherence to these rules, talk to your supervisor.
Provide the authority source of the subject term in the Source drop-down menu (Field 2).
Do not use Scope Note (Field 3).
Click the Add Term/Subdivision button (Field 4) until the needed number of term fields are present. For example, Surveying – Pennsylvania – Philadelphia will have three term fields.
Provide each subdivided term in its own Term field (Field 5). Select the type of term from the term Type drop-down (Field 6). For LCSH, use the term types of Temporal, Topical, Uniform Title, or Geographic as appropriate. For AAT and LCGFT, select Genre/Form.
Subdivisions can be removed by clicking on the x __button (button 7) in the appropriate subdivision sub-form. Subdivisions can be rearranged by clicking and dragging the three-line icon on the top left of the subdivision form.
When the subject record is complete, click the Save Subject button (Field 8) to save the record. If you navigated to the Subject screen using the Create option in the Resource/Archival Object screens, the subject will be automatically linked to the respective Resource/Archival Object.